Hazzaaa
New member
Minecraft Forge | Installation Guide
Prerequisites:Downloading Minecraft Forge
Assuming, you’ve already installed and ran Minecraft 1.12.2 on your PC at least once (if not, please do so before going ahead with this guide), you’ll need to download the correct Forge Version (link above).
Once downloaded the Forge Installer, you’ll be met with the following screen:
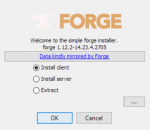
It’s recommended you LEAVE all settings as is, unless you ABSOLUTELY know what you’re doing. Once the window is loaded, go ahead and click OK. This will allow the Installer to go ahead and install the files.
If the installation went smooth, you’ll be sent the following message.

Downloading Pixelmon
The Pixelmon Mod version you need is linked directly to this guide. All you need to do is click the link and let the download begin. Once the download is complete, you’ll be met with a .jar file called “Pixelmon-1.12.2-7.0.1-universal”.
So now you’ll need to head to your game directory. (On Windows you need to Hold the Windows Key + R and then type “%appdata%\.minecraft” to enter the game directory.
Once at the directory, you’ll be met with a folder that looks similar to this.
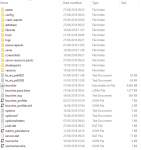
If you do NOT see a folder called “mods” here, please go ahead and create one.
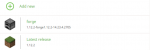
After you created the “mods” folder, double-click and enter the folder. Here is where you will place the .jar. Now go ahead and copy the Pixelmon.jar you downloaded and paste it in the “mods” folder.

The folder should now look like this. This means Pixelmon is now Installed correctly.
Configuring Minecraft Launcher
There’s a few more things left to do. Pixelmon is a rather resource-heavy mod so you’ll have to tweak some settings in Minecraft Launcher to keep Pixelmon from slowing down and crashing your game.
After opening the Minecraft Launcher, click the Menu button towards the top-right and then select “Launch Options”.

Once here, you’ll need to enable “Advanced Settings”. Make sure it’s checked before continuing.

Once you’re at Launch Options, you’ll see a list of all your Game Profiles. We’re only interested in the Game Profile called “1.12.2-forge1.12.2-14.23.5.2768”
Click the forge profile and then check JVM Arguments so it turns Green. This’ll enable you to edit JVM Arguments. Please DO NOT mess with anything other than the following JVM Argument.
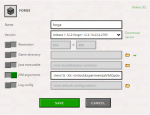
Please change the argument “-Xmx1G” to “-Xmx2G” and then click Save on the launcher. What this’ll do is double the amount of RAM allocated to Pixelmon. This’ll stop you from randomly crashing and getting randomly disconnected. It’ll also maximise your FPS in-game as the Game has plenty of RAM to run properly.
Once done, all you need to do now is click Play and enjoy the game.
Troubleshooting | Help and Support
Welcome to the Troubleshooting section. If you’re experiencing issues, this section will help you resolve it.
If you’re having issues, please go to the “Troubleshooter”.
The Troubleshooter asks you several questions to help you find out the cause of the issue and how to resolve it. It also will have a log of all known and common errors if you don’t find the Troubleshooter helpful to you and if you’d like to diagnose the issue yourself.
Assuming, you’ve already installed and ran Minecraft 1.12.2 on your PC at least once (if not, please do so before going ahead with this guide), you’ll need to download the correct Forge Version (link above).
Once downloaded the Forge Installer, you’ll be met with the following screen:
It’s recommended you LEAVE all settings as is, unless you ABSOLUTELY know what you’re doing. Once the window is loaded, go ahead and click OK. This will allow the Installer to go ahead and install the files.
If the installation went smooth, you’ll be sent the following message.
Downloading Pixelmon
The Pixelmon Mod version you need is linked directly to this guide. All you need to do is click the link and let the download begin. Once the download is complete, you’ll be met with a .jar file called “Pixelmon-1.12.2-7.0.1-universal”.
So now you’ll need to head to your game directory. (On Windows you need to Hold the Windows Key + R and then type “%appdata%\.minecraft” to enter the game directory.
Once at the directory, you’ll be met with a folder that looks similar to this.
If you do NOT see a folder called “mods” here, please go ahead and create one.
After you created the “mods” folder, double-click and enter the folder. Here is where you will place the .jar. Now go ahead and copy the Pixelmon.jar you downloaded and paste it in the “mods” folder.
The folder should now look like this. This means Pixelmon is now Installed correctly.
Configuring Minecraft Launcher
There’s a few more things left to do. Pixelmon is a rather resource-heavy mod so you’ll have to tweak some settings in Minecraft Launcher to keep Pixelmon from slowing down and crashing your game.
After opening the Minecraft Launcher, click the Menu button towards the top-right and then select “Launch Options”.
Once here, you’ll need to enable “Advanced Settings”. Make sure it’s checked before continuing.
Once you’re at Launch Options, you’ll see a list of all your Game Profiles. We’re only interested in the Game Profile called “1.12.2-forge1.12.2-14.23.5.2768”
Click the forge profile and then check JVM Arguments so it turns Green. This’ll enable you to edit JVM Arguments. Please DO NOT mess with anything other than the following JVM Argument.
Please change the argument “-Xmx1G” to “-Xmx2G” and then click Save on the launcher. What this’ll do is double the amount of RAM allocated to Pixelmon. This’ll stop you from randomly crashing and getting randomly disconnected. It’ll also maximise your FPS in-game as the Game has plenty of RAM to run properly.
Once done, all you need to do now is click Play and enjoy the game.
Troubleshooting | Help and Support
Welcome to the Troubleshooting section. If you’re experiencing issues, this section will help you resolve it.
If you’re having issues, please go to the “Troubleshooter”.
The Troubleshooter asks you several questions to help you find out the cause of the issue and how to resolve it. It also will have a log of all known and common errors if you don’t find the Troubleshooter helpful to you and if you’d like to diagnose the issue yourself.
Last edited by a moderator: