 Vanilla
 Cobblemon
Gold_grilz7
New member
Claiming Guide
This Claiming Guide will cover the new claiming system that is being introduced on Violet and Red! This will cover topics such as the basics of claiming, editing claims, editing the permissions of your claim, inviting friends, and more! Let us begin!
What is a Claim?
A Claim is a customizable group of chunk(s) that you can edit and manage to your liking! Claims are made through the usage of Claim Chunks (see How do I make a Claim? below for further information) and they are used to prevent unwanted access to your property. You can invite friends to your Claim and provide them access to it so you may play together, and you can also set a designated Home within the Claim that can be teleported to as needed. Claims are essential to ensuring your progression on Complex is safe and secure!
Main Claiming Menu Information
Claims can be made in the Overworld, Ultra-Space, and the Nether, all of which can be accessed through /rtp. In order to make a Claim, you will need Claim Chunks. Claim Chunks are the currency of the Claiming system and allow you to create/expand claims as you wish. In order to access the Claiming system, you can use /claim. This will bring up the following menu:

Let's start with the Nether Star in the middle. When you hover over it, you will see whether you are in a Claim, or in an unclaimed Chunk. It will also tell you the coordinates of the Chunk along with the Claim Chunk cost required to make a Claim at this location. Left-Clicking this will Claim the Chunk you are standing in if it is unowned and you have enough Claim Chunks available.
Next we have the bottom-left Player Head Icon. Hovering over this will show you how many Claim Chunks you currently own. Left-Clicking this will allow you to purchase more Claim Chunks for a base price of $5,000 Coins with $250 Coins added on per Claim Chunk already owned. Note that one Claim Chunk allows you to claim 1 Minecraft Chunk (16 x 256 x 16).
The bottom-center Green Glass will show you the current Claim you are expanding on with your Claim Chunks. Left-Clicking this will allow you to select which Claim you are editing.
The Chest on the bottom-right will allow you to view and edit your Claims. Left-Click this icon to view all of your current Claims. Left-Clicking the Book on the bottom-center of this menu will allow you to create a new Claim.
How do I make a Claim?
Making a Claim starts with navigating to the Your Claims menu under the /claim command. This menu can be accessed by left-clicking the Chest Icon on the bottom-right of the main menu. Then, left-click the Book to create your Claim. Once you have done this, you will be sent back to the main menu with a confirmation chat message stating your Claim has been successfully created.
Next, you want to travel to the Minecraft Chunk you'd like to Claim. Once you have found a suitable area, run the /claim command and left-click the Green Glass on the bottom-center of the main menu. Select the Claim you'd like to add the Chunk to and confirm you are standing in the correct Chunk you'd like to Claim. Then, left-click the Nether Star in the main menu to add the Chunk to your selected Claim.
To confirm you have Claimed the intended area, exit out of the menu and look for the Green Particles in the air. These will show you the borders of the area you have Claimed.
How do I Manage My Claims?
To manage your Claims, run the /claim command, left-click the Chest Icon, and then left-click the Claim you'd like to manage. This will bring up the following menu:

The top-center Green Glass will show you information on how big the Claim is, where the center is, the owner of the Claim, your rank in the Claim, how long you have been part of the Claim, and how many others are in the Claim.
Claim Upgrades
Left-Clicking the Anvil will bring you to the Claim Upgrades menu. Within this menu you will find options to increase your Claim's Member Limit and Home Limit. Both of these options have tiers that can be increased by purchasing these upgrades.


Claim Homes
Claim Homes are Homes that can be designated within your Claim, similar to Warps. These can be used by any member of the Claim and are customizable within the Claim Homes tab (left-click the Ender Pearl in the Manage Claims menu). You can edit the name, minimum rank required, and the Home's icon. The Owner of the Claim can set any of the Claim Homes as the Primary Home to make it more accessible. The Primary Home can be warped to through left-clicking the Bed Icon in the Manage Claims menu.

Claim Permissions
Left-Clicking the Barrier Block in the Manage Claims menu allows you to edit your Claim's Permissions. This puts all of the power to customize the Claim into the Owner's hands. This tab allows you and those with complete permission access to your Claim to edit almost every aspect of the Claim. You can left-click the bottom-center Coal Icon to switch through the ranks, starting from Visitor to Admin, in order to edit permissions based on the specific rank. These changes range from Placing/Breaking Blocks to Capturing Pokémon within the Claim.

Claim Settings
To edit your Claim's Settings, left-click the Machine Display Icon in the Manage Claims menu. This is where you are able to edit specific Admin Settings on your Claim. You can enable/disable Pokémon Spawning, Boss Spawning, and NPC Spawning. You can also rename or delete your Claim here, which will bring up a confirmation GUI prior to deletion. Note: When you delete Chunks from your Claim, you will receive 50% of the total Claim Chunks used. For example, if you delete 1 Claim Chunk, you will receive 0.5 back.

Claim Members
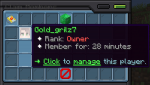
The Claim Members menu (accessed through left-clicking the Player Head Icon in the Manage Claims menu) allows you to view and edit your Claim's Members. You can also invite them with the Emerald Block at the top of this screen. Hovering over each individual Member will show their Rank, and how long they have been a member of this Claim. Left-Clicking on a Member will show three options: Promote/Demote, Kick and Title. Promote/Demote is used to promote or demote a member of your Claim in rank, Kick will remove a player from your Claim, and Title can give individuals that are part of your Claim a title that you see fit.

Allowing Friends To Claim Near You
In order to have those you trust be able to Claim near you, you can use the /friends Menu. Middle-Click on the Friend you would like to allow to do this, then select the Allow Nearby Claims option.

That should cover all of the features and changes found in the brand new Claiming System on Violet! If you have any further questions, feel free to ask in-game or make a Ticket on our Discord. Our Staff will be happy to assist you!
This Claiming Guide will cover the new claiming system that is being introduced on Violet and Red! This will cover topics such as the basics of claiming, editing claims, editing the permissions of your claim, inviting friends, and more! Let us begin!
What is a Claim?
A Claim is a customizable group of chunk(s) that you can edit and manage to your liking! Claims are made through the usage of Claim Chunks (see How do I make a Claim? below for further information) and they are used to prevent unwanted access to your property. You can invite friends to your Claim and provide them access to it so you may play together, and you can also set a designated Home within the Claim that can be teleported to as needed. Claims are essential to ensuring your progression on Complex is safe and secure!
Main Claiming Menu Information
Claims can be made in the Overworld, Ultra-Space, and the Nether, all of which can be accessed through /rtp. In order to make a Claim, you will need Claim Chunks. Claim Chunks are the currency of the Claiming system and allow you to create/expand claims as you wish. In order to access the Claiming system, you can use /claim. This will bring up the following menu:
Let's start with the Nether Star in the middle. When you hover over it, you will see whether you are in a Claim, or in an unclaimed Chunk. It will also tell you the coordinates of the Chunk along with the Claim Chunk cost required to make a Claim at this location. Left-Clicking this will Claim the Chunk you are standing in if it is unowned and you have enough Claim Chunks available.
Next we have the bottom-left Player Head Icon. Hovering over this will show you how many Claim Chunks you currently own. Left-Clicking this will allow you to purchase more Claim Chunks for a base price of $5,000 Coins with $250 Coins added on per Claim Chunk already owned. Note that one Claim Chunk allows you to claim 1 Minecraft Chunk (16 x 256 x 16).
The bottom-center Green Glass will show you the current Claim you are expanding on with your Claim Chunks. Left-Clicking this will allow you to select which Claim you are editing.
The Chest on the bottom-right will allow you to view and edit your Claims. Left-Click this icon to view all of your current Claims. Left-Clicking the Book on the bottom-center of this menu will allow you to create a new Claim.
How do I make a Claim?
Making a Claim starts with navigating to the Your Claims menu under the /claim command. This menu can be accessed by left-clicking the Chest Icon on the bottom-right of the main menu. Then, left-click the Book to create your Claim. Once you have done this, you will be sent back to the main menu with a confirmation chat message stating your Claim has been successfully created.
Next, you want to travel to the Minecraft Chunk you'd like to Claim. Once you have found a suitable area, run the /claim command and left-click the Green Glass on the bottom-center of the main menu. Select the Claim you'd like to add the Chunk to and confirm you are standing in the correct Chunk you'd like to Claim. Then, left-click the Nether Star in the main menu to add the Chunk to your selected Claim.
To confirm you have Claimed the intended area, exit out of the menu and look for the Green Particles in the air. These will show you the borders of the area you have Claimed.
How do I Manage My Claims?
To manage your Claims, run the /claim command, left-click the Chest Icon, and then left-click the Claim you'd like to manage. This will bring up the following menu:
The top-center Green Glass will show you information on how big the Claim is, where the center is, the owner of the Claim, your rank in the Claim, how long you have been part of the Claim, and how many others are in the Claim.
Claim Upgrades
Left-Clicking the Anvil will bring you to the Claim Upgrades menu. Within this menu you will find options to increase your Claim's Member Limit and Home Limit. Both of these options have tiers that can be increased by purchasing these upgrades.
Claim Homes
Claim Homes are Homes that can be designated within your Claim, similar to Warps. These can be used by any member of the Claim and are customizable within the Claim Homes tab (left-click the Ender Pearl in the Manage Claims menu). You can edit the name, minimum rank required, and the Home's icon. The Owner of the Claim can set any of the Claim Homes as the Primary Home to make it more accessible. The Primary Home can be warped to through left-clicking the Bed Icon in the Manage Claims menu.
Claim Permissions
Left-Clicking the Barrier Block in the Manage Claims menu allows you to edit your Claim's Permissions. This puts all of the power to customize the Claim into the Owner's hands. This tab allows you and those with complete permission access to your Claim to edit almost every aspect of the Claim. You can left-click the bottom-center Coal Icon to switch through the ranks, starting from Visitor to Admin, in order to edit permissions based on the specific rank. These changes range from Placing/Breaking Blocks to Capturing Pokémon within the Claim.
Claim Settings
To edit your Claim's Settings, left-click the Machine Display Icon in the Manage Claims menu. This is where you are able to edit specific Admin Settings on your Claim. You can enable/disable Pokémon Spawning, Boss Spawning, and NPC Spawning. You can also rename or delete your Claim here, which will bring up a confirmation GUI prior to deletion. Note: When you delete Chunks from your Claim, you will receive 50% of the total Claim Chunks used. For example, if you delete 1 Claim Chunk, you will receive 0.5 back.
Claim Members
The Claim Members menu (accessed through left-clicking the Player Head Icon in the Manage Claims menu) allows you to view and edit your Claim's Members. You can also invite them with the Emerald Block at the top of this screen. Hovering over each individual Member will show their Rank, and how long they have been a member of this Claim. Left-Clicking on a Member will show three options: Promote/Demote, Kick and Title. Promote/Demote is used to promote or demote a member of your Claim in rank, Kick will remove a player from your Claim, and Title can give individuals that are part of your Claim a title that you see fit.
Allowing Friends To Claim Near You
In order to have those you trust be able to Claim near you, you can use the /friends Menu. Middle-Click on the Friend you would like to allow to do this, then select the Allow Nearby Claims option.
That should cover all of the features and changes found in the brand new Claiming System on Violet! If you have any further questions, feel free to ask in-game or make a Ticket on our Discord. Our Staff will be happy to assist you!
Attachments
Last edited by a moderator: