Complex Survival
A thread on how to get started on Complex Survival.
Survival is a loving community filled with all types of players. There is no right or wrong way to play, most prefer to rise to the #1 position in wealthiest players. (type /baltop to see the richest players!) Others prefer to build towns and thriving districts filled with contributing players.A thread on how to get started on Complex Survival.
With constant updates from our Developer team, survival maintains a fresh experience tailored to all players from New -> Veterans!
Here is a guide for everything Survival to get you started on your epic journey.
Getting Started
Creating a claim and navigating the /claims GUI.
Finding a place to startCreating a claim and navigating the /claims GUI.
Before you start your journey, you’ll need to decide where to live! There are many custom generated biomes on our server, and finding the right one is easy. First thing you’ll want to do is type /rtp (randomteleport). Once you do, a GUI will pop up. On it you will see several options to choose from, as well as a filter option to select certain vanilla biomes.
There are four teleport options to choose from:
- The Overworld
- The overworld is a regular minecraft world with custom generated terrain and open to all for exploration!
- The Resource World
- The resource world is an exact replica of the overworld; without the ability to claim land. It is reset every so often, so players have a chance to find rare loot that would have otherwise been obtained long ago.
- The Nether
- The nether is generated as vanilla minecraft and can still be accessed through portals!
- The End
- The end is generated as vanilla minecraft, however can only be accessed via /rtp.
Filtering biomes
In the top left of the /rtp GUI, you will see a grass block. Clicking that will open the biome filtering menu. Selecting one of the biomes will ensure your next /rtp takes you to the biome of choice. (NOTE: None of the custom generated biomes like Sakura Forest, Crimson Forest, etc. are capable of being filtered into.)
Creating an Claim
To create a claim, begin by typing the command /claims. Once you have done that, a GUI should pop up showing an emerald block. Clicking this will create your own claim. A confirmation message should show in chat that your claim was created.
Navigating the /claims GUI
Once you have made your own claim, you can now type /claims to open the Land GUI. When you first open the GUI, you will be shown a 9 x 5 chunk map of available and claimed chunks. From there you can either Left-Click to claim chunks on the Map GUI or Right-Click to manage your land once claimed.
In the Claims Manage Menu, you will be given the following options:
- Claims Upgrade - View / purchase claim upgrades
- Claim Members Limit
- Claim Warps Limit
- Public Warps Limit
- Elevators Limit
- Claim Home - Teleports to your claim home
- Claim Permissions - View / edit claim permissions
- Claim Warps - View / create claim warps
- Claim Settings - View / Manage claim settings
- Claim Members - View / Manage claim members
- Delete / Leave Claim - Warning: Deletes your claim!

Creating Claim Warps
Once you have set up your claimed land, you may run the command /claims list, select the claim you want your warp to be in. Simply select the ender pearl icon in the first photo below. You should then see the following GUI in the 2nd image below.

Simply stand at the desired warp location, then click the barrier block to create your very own land warp. As it says once you have created your warp, right click to manage and left click to teleport to it. If you do not wish to have certain roles in the claim to have access to the warp, simply edit that in the permission sections in the claim’s home GUI.

Making your warp a /pw or public warp
Players might want to make a player shop, mob grinder, villager trading post, etc for others to visit.. In that case, you’ll need to set up a public warp. You will need to have completed the previous guide in setting up a home warp. Once you are ready to turn it into a public one, simply select the warp by doing /claims list > selecting the claim > clicking the claims warp menu, and then right clicking the warp you set up previously.

Clicking the sign on the warp management menu allows you to toggle whether it is public or not, change the category of warps it is (grinder, market, etc), select the icon that warp will appear as on the /pw GUI, and more.
Daily Rewards
Daily things you can do to get money easily.
VotingDaily things you can do to get money easily.
A quick and easy way to get money is by voting. If you type /vote in the game, a link will pop up in chat which will direct you to all 8 vanilla voting links when clicked on. Each of those sites will give out rewards to you when voting for the Complex Network. Once the vote comes through on the server you receive 1 Vote Key, $500, 5 Mystery Dust, and 5 Minutes of Flight Time per vote link. Voting can be done once every 24 hours.
Vote Parties
Vote Parties are an easy way of getting crate keys if you aren't wanting to spend money on our /store. Every 150 votes, a vote party will begin. You will be alerted with a message in chat that a vote party will start in 1 Minute. To check the status of vote parties, run the command /voteparty. When a vote party occurs, you will have a chance to get any other crate key available on Survival, with the exception of Limited Time Crates. In order to be eligible to receive rewards from a vote party, you need to have voted at least once within the past 24 hours. To check if you have voted in the past 24 hours, run the command /haveivotedtoday.
Dailies
Another way to get daily rewards is by typing /dailies in the chat. Doing this will open a GUI where you can collect your daily rewards. If you want more rewards each day, that is possible by purchasing a rank on the store (use /store to get the link for the store). As a member you will only have the following reward which you can collect every 18 hours:

Basics
Basic stuff you can do to make money.
FarmingBasic stuff you can do to make money.
Setting up the perfect farm can be tough as not every method works for everyone. There are benefits to automatic (afk) crop farming, but there are also deficits to this. Manual farming provides the benefits from your hoe’s runes and enchants which can double your harvest’s sell price, replant the crops after breaking them, automatically sell your crops after harvesting them, and much more. Automatic farming however, does not reap the benefits of this as there are no ways to fully afk using a hoe.
Use /shop and browse the sell prices of crops in the Crops and Harvest section. Potatoes are what players prefer to use for their mass manual crop farms.
Automatic Farming - Villager farms can be a great way to automate the process of crop farming, this allows a passive gain of potatoes or carrots which sell for a decent price in the /shop. This farm primarily uses the Villager’s breeding mechanics, catching the crops that they throw to each other, storing it in a chest system for the player to sell.
Manual Farming - Runes are very powerful when put on hoes (especially event crate hoes obtained in special events, e.g: Christmas Crate) runes like: Greedy Greens, Herbalist, Holy Cultivation and much more, make manual crop farming one of the most profitable ways to make loads of money on the Survival server. Setting up large crop fields filled with potatoes or carrots 4 blocks from water sources is the most efficient way to farm. The picture seen to the right shows the most optimal way to mass farm crops. This displayed farming layout is ‘modular’ allowing it to be repeated as many times as you want. The more crops you harvest the more money you will make.

Spawners
Spawners are an essential part of the economy in survival. There are different spawners that provide different monetary gains. These spawners can be used for either manual use or automatic use, you are able to find these spawners in the /shop or through players selling them for a cheaper price.
Provided below is a table that shows the buy cost and sell price of one FULL DOUBLE CHEST of the item drops from spawners that are worthwhile for profits.
| Spawner | Buy Price (1 Spawner) | Sell Price (Double Chest) |
| Pig | $100,000 | $8,052.5 |
| Creeper | $2,800,000 | $77,414.4 |
| Blaze | $3,600,000 | $82,944.0 |
| Iron Golem | $9,000,000 | $50,112.0 |
| Piglin | $11,000,000 | $207,360 |
| Villager | $25,000,000 | $392,601.6 |
In the table above you can see the progression of spawners, spawners with a higher purchase price tend to have a higher sell price. There are other spawners which are not included, check /shop for buy and sell prices.
New Players:
If you are a new player wanting to make money in the economy then you will want to start with pig spawners and work your way up, selling pork for profit and then upgrading to the next most profitable until you get to a point where you can have mass quantities of high tier spawners
Efficiency:
In Complex’s Survival server, there is an efficiency debuff. This implies whenever spawners are grouped in large quantities, after 500 spawners the efficiency will decrease according to the following formula: 30^-(x / 5000) + 0.25 !
Efficiency can be checked by right clicking on the spawners, this will show the spawners within 5 chunks (the affected area) and will display the efficiency as a percentage.
AFK Farming:
AFK farming is allowed with certain stipulations, these are:
- One Alt Per Farm per player (one alt for ig’s ect)
- Maximum of four alts per player
- One farm, per spawner type per player (efficiency evading is against the rules)
Farm Design:
It is recommended that farms be created as lossless as possible, this may include using water pathways and many hoppers to successfully store the most possible items. This you will need to create on your own.
Mob Tier
Here on Survival, we have a Mob Tier leveling system in order to purchase spawners. When you first begin you will only be able to purchase Pig & Sheep spawners from /shop. To unlock the other spawners and allow purchasing, you need to complete each Mob Tier below.
- Mob Tier 1
- Pig
- Unlocked by default
- Mob Tier 2
- Cow & Sheep
- Requires 2,000 Pig/Sheep kills to unlock
- Mob Tier 3
- Chicken & Zombie
- Requires 2,500 Cow kills to unlock
- Mob Tier 4
- Skeleton & Creeper
- Requires 5,000 Chicken/Zombie kills to unlock
- Mob Tier 5
- Panda & Blaze
- Requires 10,000 Skeleton/Creeper kills to unlock
- Mob Tier 6
- Hoglin & Turtle
- Requires 15,000 Panda/Blaze kills to unlock
- Mob Tier 7
- Enderman & Iron Golem
- Requires 25,000 Hoglin/Turtle kills to unlock
- Mob Tier 8
- Piglin & Villager
- Requires 35,000 Enderman/Iron Golem kills to unlock
- Mob Tier 9
- Silverfish
- Requires 40,000 Piglin/Villager kills to unlock
- Mob Tier 10
- Endermite
- Requires 250,000 Silverfish kills to unlock
Gambling
Guide to all the gambling activities for Survival.
CoinflipsGuide to all the gambling activities for Survival.
Coinflips are a game of luck where each participating player has a 50% chance of winning both players' wager. You can host your own coinflip by typing /cf <amount>, if you only want a specific player to be able to join your coinflip, type /cf <amount> [PlayerName]. A 5% tax is automatically deducted from the winnings of a coinflip. To see all active coinflips type /cf.
Jackpot
The /jackpot is a raffle competition where players can buy tickets to give them a chance in winning the jackpot prize. This prize will fluctuate depending on how many tickets are bought by each player. Buying multiple jackpot tickets will increase your chance; however, the cap on the amount of tickets able to be bought by one player is maxed at 5. Chances at winning the jackpot automatically fluctuate with the amount of tickets.
Once you have ran either commands, /jackpot or /jp, you will be presented with image 1 below, clicking on the name tag will bring you to a GUI menu where you can buy your tickets to enter. This GUI is shown in image 2.

Warzone & Envoys
All you need to know about PVP on Survival.
All you need to know about PVP on Survival.
Warzone
The warzone in survival is much like that of the Prison’s pvp and Skyblock’s pvp areas. 1.9+ pvp which means cooldown hits and not spam clicking. The pvp zone changes per season and the current survival has a beautiful Japanese style warzone. To view the pictures of this beautiful landscape, click here.
Envoys
Explanation on Envoys - Every ~2 hours there is an envoy that will appear in the /warp pvp. This envoy may drop very valuable loot ranging from Common to Epic Drops, however, be careful as these envoys are quite special to those that pvp. Players with high level gear might try to defend this.
Extras
Special things available to you on Survival.
Infuser/RunesSpecial things available to you on Survival.
Here on Survival, we have a rune system which is our take on custom enchants. You can acquire runes through our infuser by doing /warp infuser. This merchant will bring up a GUI showing which runes you can buy. There are 4 tiers available to you for purchase:
Here on Survival, we have a rune system which is our take on custom enchants. You can acquire runes through our infuser by doing /warp infuser. This merchant will bring up a GUI showing which runes you can buy. There are 4 tiers available to you for purchase:
- Common - Cost: 5 000 XP
- Rare - Cost: 20 000 XP
- Legendary - Cost: 50 000 XP
- Mythical - Cost: 100 000 XP
- Lucky Gems - 10 000 XP
(Left-Click to purchase a rune or Right-Click to see all available enchants)
Below that, you will find our crate exclusive runes. Here, you will find all available enchants that were available for a limited time from exclusive crates (These runes are not available for purchase). Below, that is the magnifying glass symbol. Here, you can identify the type, level, and chance of unidentified runes that you have found from the Rune Detector enchant. This enchant has a chance to drop unidentified runes when mining ores, with higher tier runes dropping from higher Rune Detector levels. Next to the Rune Identifier is the clover symbol. This is where you can purchase Lucky Gems to increase the chance of your rune applying to your gear/tools. Each rune has a Success, Fail, and Critical Fail percentage. The more lucky gems you apply, the higher your Success percentage will be. You can read more about Success, Fail, and Critical Fail percentages by hovering over the book with a question mark on it. Next to that book, is where you can incinerate runes. Here you can destroy any unwanted rune and convert it into its XP value. Lastly, are cleansing wands. Cleansing wands allow you to remove a single unwanted rune/enchant from any gear/tool. Cleansing wands will be consumed on usage.

Reset Vault
Here on Complex Survival, we have a Reset Vault that allows you to save your items so that you can use them after the map has been reset. Reset Vaults will be unavailable until an upcoming reset is announced for Survival. Once the Reset Vault has been unlocked, you are able to save items to it so long as you have an available slot. However, there are some rules that apply when saving items:
- Once you have saved an item to your Reset Vault, it cannot be retrieved until the map has been reset.
- Stacked Items, Shulker Boxes, Spawners, Runes, Enchant Books, Pouches, and Banknotes cannot be saved to the Reset Vault
- Enchanted items will lose all their enchants when added to the Reset Vault. For example a Diamond Pickaxe with Unbreaking 1 will turn into an unenchanted Diamond Pickaxe when you claim it from your Reset Vault.
- Crate Exclusive Items will keep all their enchants when added to the Reset Vault.
Clue Scrolls
Scrolls are an easy way to earn rewards by completing various tasks. Tasks can vary from breaking/placing blocks, typing something in chat, crafting an item in order to solve a riddle, and more. There are 3 types of scrolls on Survival: Ronin, Daimyo, and Emperor. Rewards from scrolls vary but can include items such as Wands, Tags, Spawners, Diamond/Emerald Blocks, and much more! Scrolls can be obtained from dailies, crates, purchasing from /ah, or from /freescrolls if you have a rank.

Boosters
Boosters can be activated to increase all XP/Money by a set multiplier and for a set amount of time depending on the type of booster. Boosters can come with either a 1.5x Multiplier, a 2.0x Multiplier or a 3.0x Multiplier. They can also be 10 Minutes, 20 Minutes, 30 Minutes, or 1 Hour long. Boosters can be obtained from clue-scrolls, Crates, or by purchasing them from /store. Boosters have one use and will be consumed after drinking.

Leaderboards
Leaderboards are a great way to earn Store Credit for purchasing ranks, crate keys, boosters, tools & more! Leaderboard Points can be earned by being in the Top 10 for any /leaderboard category. At the end of the week, the Top 12 players with the most Points are rewarded with Store Credit.

Auction House
Another vital part of the game is the Auction House, in the Auction House you can buy/sell items that aren’t able to be sold or bought in the regular /shop like Tags, Runes, XP, Gold Shards, and more. Selling through the Auction House is an important way to earn extra income from rare/exclusive items players cannot get through the shop. The Auction House can be accessed by doing /ah while in game.
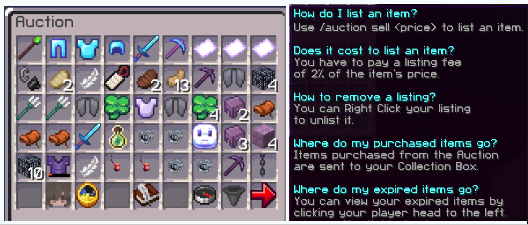
Bought items will appear in your Collection Box in /ah.
Hoppers
Our upgradable hoppers allow for grinders and other farms you may set up, to become fully automated in terms of storage. By simply typing /hoppershop or /hoppers you can open a gui which will allow for quick and easy purchase. These upgradable hoppers are set apart from regular vanilla ones as they allow for an intuitive upgrades system.
We have a Linking system in place to help pass items from the hopper directly into the chest system. The amount of chests that one hopper may be Linked to is determined by the amount you spend on the given configuration.
To link your hopper to a chest, left click on the purple portal block in the gui of the upgradable hopper. In chat you will then be prompted to click on the chest you wish to link.
After linking the hoppers to the chests, you’re able to manage these, individually, you can change the settings of each to better suit your collection system for your grinder, your farm, whatever you may be using them for. Managing these links is not necessary to making an efficient farm, however, it is very helpful when it comes to organizing. Our custom drops from a lot of the mobs you might find yourself making a farm out of, have what we call, ‘junk items’. To filter out these items we use the blacklist and whitelist feature embedded into the hopper system.
Simply click to manage the chest you want
Whitelisting items allows for a strict pass-through of only the items you want to enter the chest. Doing this is simple, simpy manage the chest and toggle the filter mode to : Whitelist.
Adding the items to the Whitelist list is very easy. Simply click on the items you want added, and it will be duplicated into the hopper.
Now, with that being done, you have successfully created a great way to filter out unwanted items. See the Deleting Items section for the (optional) next step in creating an effective storage system.
Blacklisting:
Much like the Whitelisting method, simply click on items you don’t want to go in, they simply will not go in. However, it is wise not to use this to blacklist every single item out there, the quicker method would be to follow the Whitelist section.
Enable the deletion of items or disable it.
- Note that each link is 1 regular, or, double chest.
- It should also be worth noting that hoppers may also be linked to barrels.
To link your hopper to a chest, left click on the purple portal block in the gui of the upgradable hopper. In chat you will then be prompted to click on the chest you wish to link.
- It should be noted that your chest must be within 100 blocks of the upgradable hopper.
- Remember if you need the coordinates please refer to the Managing Links section below.
After linking the hoppers to the chests, you’re able to manage these, individually, you can change the settings of each to better suit your collection system for your grinder, your farm, whatever you may be using them for. Managing these links is not necessary to making an efficient farm, however, it is very helpful when it comes to organizing. Our custom drops from a lot of the mobs you might find yourself making a farm out of, have what we call, ‘junk items’. To filter out these items we use the blacklist and whitelist feature embedded into the hopper system.
Simply click to manage the chest you want
- To whitelist, set it to that
- Delete items that aren’t.
- To add to the list, click the item.
Whitelisting items allows for a strict pass-through of only the items you want to enter the chest. Doing this is simple, simpy manage the chest and toggle the filter mode to : Whitelist.
Adding the items to the Whitelist list is very easy. Simply click on the items you want added, and it will be duplicated into the hopper.
Now, with that being done, you have successfully created a great way to filter out unwanted items. See the Deleting Items section for the (optional) next step in creating an effective storage system.
Blacklisting:
Much like the Whitelisting method, simply click on items you don’t want to go in, they simply will not go in. However, it is wise not to use this to blacklist every single item out there, the quicker method would be to follow the Whitelist section.
- Note that Blacklisting items means the items in the list will NOT pass into the chests.
Enable the deletion of items or disable it.
Regular hoppers only have a suction radius of 1 but with the upgradable hoppers, you can increase that radius allowing items to be picked up from further away. This allows for use of many things like farms, mob grinders, and more. Each upgrade costs a bit more than the last but increases the suction radius by one.
We hope this can get you started on your journey to becoming a great Survival player! If you have any further questions make sure to ask the staff members that are online at the time, or the helpful community as they will be able to answer most of your questions!
Be sure to check out our other guides down below!
Chest Shop Guide
[Skyblock] Pharaoh's Tomb Guide
Prison Guide
Factions Guide
Survival Guide
[Global] Runes Guide
[Global] Tag Guide
Kind regards,
The entire Complex Staff Team!
Last edited: